Holiday Pancakes

IMG_3126

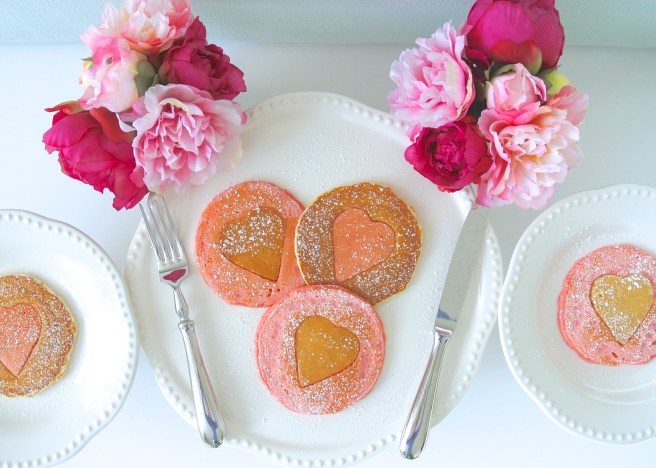
Whether you’re throwing a festive Valentine’s Day brunch or looking to feed a very hungry partner in the kitchen, these heartful pancakes are a must!

Every year I ambitiously plan to make a super elaborate Valentine’s Day brunch.. but every year I wake up on the 14th still dreaming that my non-existent private chef is patiently waiting to serve me breakfast in bed.

I often forget how easy pancakes are and with one extra step you can dress up an old recipe into a stunning holiday plate! Add a fun twist to your routine breakfast without losing any of the original, scrumptious pancake flavor.

DSC_3412 - Version 2

You will need:

– Pancake Mix (I used Martha Stewart’s recipe)
– Red food coloring
– Heart shaped cookie cutter
– Powdered sugar or toppings of choice


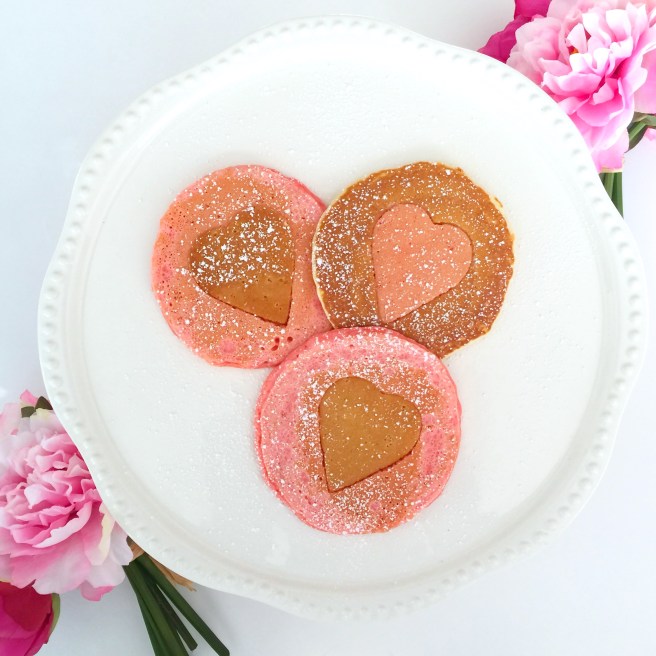
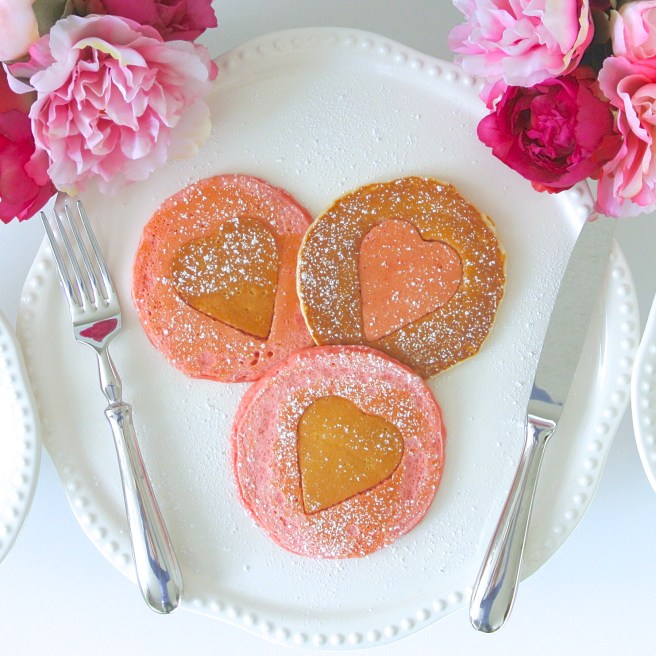
  • Split pancake batter into 2 bowls and put a few drops of red food coloring in one of the bowls. I used about 5 drops of coloring until the mix turned a medium red. Make pancakes as instructed and place them on a flat surface.
  •  Press your cookie cutter into the pancake and gently move it from side to side to make sure it has successfully cut through.
  • Collect the heart cut outs and gently place it back inside the pancake of opposite color. *Optional: place pancakes in the oven at 200°F for a few minutes to warm up before serving.  

IMG_3125

  • Top with powdered sugar and enjoy!

DSC_3412

Ice Cream Cookie Cups

IMG_0506

Day 1 of a new juice cleanse and I’m drooling looking back on these scrumptious ice cream sundae cups I made last weekend.

Cookie + ice cream + melted chocolate.. I think the mouthwatering picture says it all.

One of the best parts about this dessert is that it’s not supposed to be super “pretty” or clean cut – the messier, the better! So pile on as many marshmallows and M&M’s as your little heart desires.


1. Preheat oven to 350°. Combine 3-4 generous tablespoons of cookie dough into a ball and place into a non-stick muffin tin. Roll the remaining dough and distribute until entire muffin tin is full.*Add more cookie dough for a thicker cookie cup.

2. Bake cookie cups for about 13 minutes or until golden brown. Pull your tray out and immediately take a spice jar and gently press into each cookie. This should form a little “crater” where the ice cream will sit.

IMG_0499

IMG_0498


3. Let the cups cool for 10 minutes. Take your ice cream of choice and place a mini scoop in the cookie cup. My ice cream started to melt pretty fast so after I scooped all the ice cream I stuck the tray in the freezer for about 10 minutes before adding my toppings.

IMG_0502

4. Before taking the tray out of the freezer make sure your chocolate is melted and all toppings are laid out. To make things easier, pull out each cup and set on a flat plate or pan before decorating.

5. Take a spoon and drench your ice cream cookie cups with chocolate and as many toppings as you can find! When finished, place desserts in the freezer for an additional 10 minutes before serving. – that is if you can get that far before sticky little fingers grab them : )

IMG_0507

IMG_0503

Enjoy!IMG_0510

You will need:

– Roll of cookie dough
– Ice cream
– Melting chocolate + toppings of choice

Cook time 13 minutes